
Now that everyone carries a camera in their pocket, it can feel like we’re all expected to excel at photography. However, like any art form, taking a good photo isn’t as easy as clicking a button.

In an ideal world, a business would have a professional on hand to perfectly capture images for their website and social media. The reality is this isn’t always feasible. New and smaller businesses tend to have limited staff, and there might not be budget for getting help.
That doesn’t mean your photos can’t still look great.
We spoke to three photographers and marketing experts and pulled together their favorite tips and tricks to for beautiful photos that anyone can take.
Between overly staged brand photos and the flood of AI-generated content, customers are more interested than ever in finding businesses with a human touch.
Public relations expert Sarah Schmidt’s favorite advice for her clients is, “Polished looks like a billboard—real looks like a recommendation…. Authentic content converts.”
Basically, your goal should be to help a potential customer imagine themselves as part of your brand. Just like real life, it shouldn’t feel perfect and sterile, but like a lived-in space that feels like home.
Good lighting can produce a photo that’s sharp, easy to see and high quality. Bad lighting can cause blurry or grainy photos that are downright unusable.
Utilize sunlight
Natural light is the easiest, cheapest and best light to use for most photos, particularly for those newer to photography.
Take it outside: If you can shoot outside, perfect. Do that. You’ll always get the most light that way. Shooting in the shade or on overcast days can help you avoid harsh shadows and glares.
Use windows: When you can’t shoot outside, windows are your next best bet. Pick a time of day where you’ll get the most sunlight without harsh sunbeams. (North-facing windows are great for this.) When you truly can’t avoid harsh lighting, use a white poster board or put foil over a piece of cardboard to reflect the light back toward your subject.
Give Your Light Some Help
Sometimes, sunlight won’t be enough on its own (or simply isn’t an option). Fortunately, there are some easy, cost-effective ways to add light.
Buy a cheap light: If you’re regularly running into this problem, a $15 to $30 light might be worth the purchase. Check out a small portable light or a ring light. Light boxes can also be a huge help with small subjects.
Create your own diffused light: For the cheapest fix, photographer Jacob Dunn and OH Marketing Group founder Tiffany O’Connell suggest placing parchment paper over an existing lamp. Just be careful not to let the bulb touch the parchment paper because the heat of the bulb can burn the paper and even start a fire.
It might seem obvious, but cleaning your lens can make a huge difference. Phone lenses are exposed to numerous elements, and a quick clean can help remove everything from pocket lint to oils from your skin. This doesn’t just prevent unsightly dots or smears showing up in your photos—it can actually help your lens get more light. To clean your lens, simply use a microfiber or lens cleaning cloth to gently wipe the surface.
Each lens on your phone offers a slightly different perspective and will change the way your subject looks. For instance, front-facing “selfie” cameras are typically not as flattering as using the 1x camera on the back of your phone. The .5x lens is great for making a room look bigger but will distort a person or animal. The 2x lens can help you achieve a blurred background, but that makes it less than ideal for landscapes.
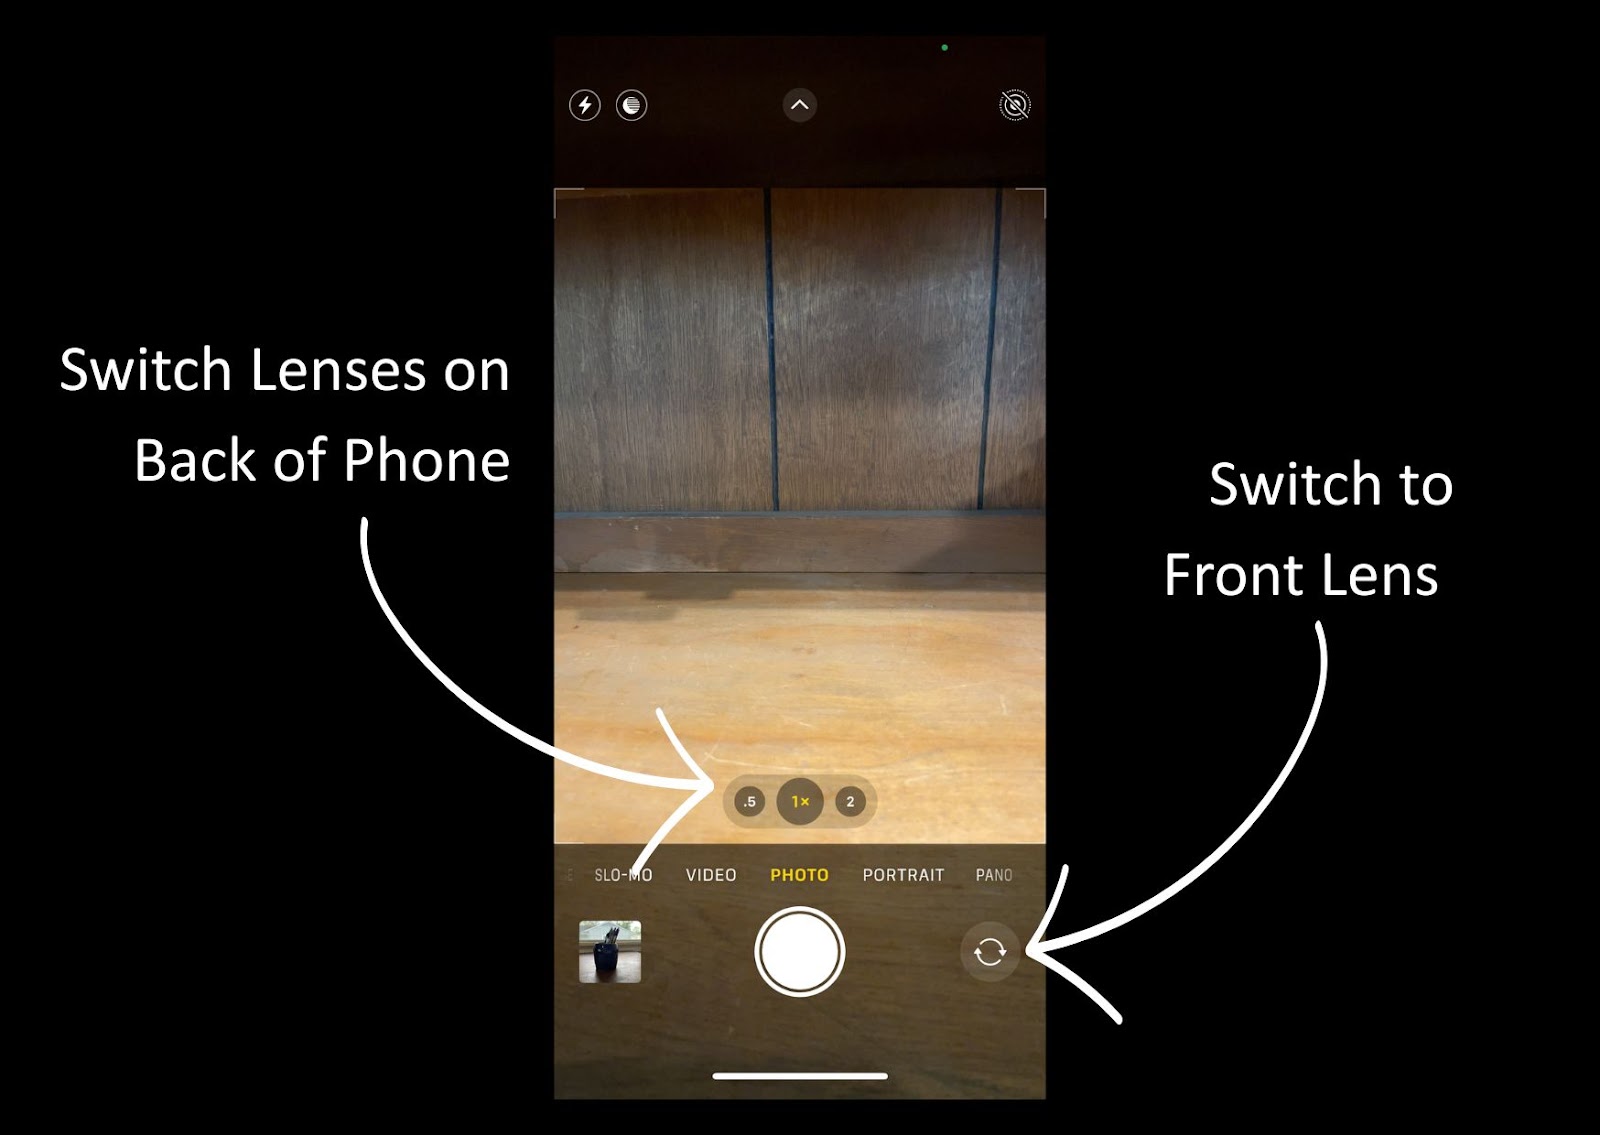
This simple diagram shows you where to change lenses and how to “flip” from the back lens to the front lens. The screenshot was created with an iPhone 12 Pro.
How to switch lenses: In your camera app, you should see numbers just above the button that you use to take the picture. These may seem like a quick way to adjust your zoom, but in reality, they’re switching which lens is in use.
Zoom with your feet: Zooming in on an image is a way of cropping it, meaning you’re lowering the quality of the photo before you’ve ever taken it. By physically moving closer or further away, you can better benefit from the different lenses and the effects they provide.
The same object photographed from roughly the same position using different lenses. From left, the .5x lens, 1x lens and 2x lens were used.
If you need to create a simple, cheap background, there are easy ways to do so. A poster board can work wonders for small subjects. Just tape it to the wall and floor with a bend in the middle, and voilá—you have a scrappy “infinity” background like all the pros. Blankets, tablecloths and shower curtains are great for larger subjects and can be sourced from existing items around your home.
For a tile or marble look, check out your local flooring store. Often, they have floor tile samples for free or cheap that you can use to create the impression of a high-end environment wherever you’re shooting.
When choosing what will be in your photo, there’s one big thing to keep in mind: What is the star of the picture? Every prop and layout should enhance the main subject and direct focus to it, not be so flashy that it distracts from it.
If you’re trying to show off your latest product release, keep the space around it simple and unobtrusive. If you’re aiming to show off a space as being cozy, consider adding a few “lived in” elements, like a cup of coffee. Remember that “lived in” doesn’t mean “dirty,” so be sure to clean your space thoroughly. No one wants to look at dust, greasy fingerprints or pet hair.
Before you ever take a photo, consider why you need the photo and how you’d like to use it. As a general rule, if you expect it to be viewed on a phone (such as on Instagram or TikTok), go vertical, and if you expect it to be viewed on a computer (such as with a website), shoot horizontally.
When in doubt, shoot both ways so you’ve got what you need regardless.
Photos by Anna Wenner
